Art Classes & Workshops
step by step
-
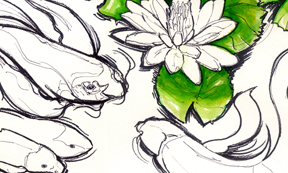
 black and white drawing
Advanced Painting Class: Step 1
ornamental fish
The Advanced Painting Class begins with planning a painting. The class first studies the subject and selects the reference materials they would like to use to composite their design. In this image, five different reference materials were used to create this black and white drawing. The teacher used the same reference and materials as the students. A pencil sketch was done referring to the design sketches for placement of the objects. This final black and white drawing was done by outlining the pencil lines in black permanent markers and than erasing any unused marks. -
 color wash
Advanced Painting Class: Step 2
ornamental fish
The Advanced Painting Class uses Dr. Martin India Inks, Liquitex Acrylic Inks and Strathmore 400 series Watercolor Paper. The painting process began with the background working light to dark. Water is added to the inks to create a value range. The students began with the lily pads using various light yellow green and green washes. The students layered subsequent darker green layers to indicate shadows and edges. Any white highlights on the lily pads were carefully avoided leaving the white of the paper. -
 building the background
Advanced Painting Class: Step 3
ornamental fish
The students painted the water lilies in the same manner working light to dark and carefully leaving the white of the paper when necessary. Next, the students began working on painting the fish. We began by examining the local colors of the fish. The students used various colors; yellow, yellow orange, orange, purple and blue gray to begin establishing the form of the fish layering light to dark washes. Carefully study was used to denote subtle details of each fish. -
 fish details
Advanced Painting Class: Step 4
ornamental fish
The fish renderings vary with each student's painting. A few employed water color techniques by wetting the surface first and than adding the inks into the water to create a feeling of movement in the tails and fins. All of the students layered darker values of red, purple, blue or grays to add the final details to the head and fins of the fish. The class studied how to render a cylinder in gray scale examining how a simple change in value creates a top and side of the cylinder. The students used this concept to distinguish the top of the fish from the side of the fish by painting the sides darker. -
 teacher sample art
Advanced Painting Class: Step 5
ornamental fish
The fun part we saved for last, painting the water. This step was done after all layers were completely dry. First the student wet the paper with water carefully cutting around the fish, lily pads and flowers. Blue tones were added in big sweeping brushstrokes. Two to three layers of various blues and purples were added to create the different values and movement of the water. The final step was done after the back ground dried. The students used turquoise washes directly on top of all pervious layers to further denote the sides of the fish. The turquoise washes help to create the underwater effect.